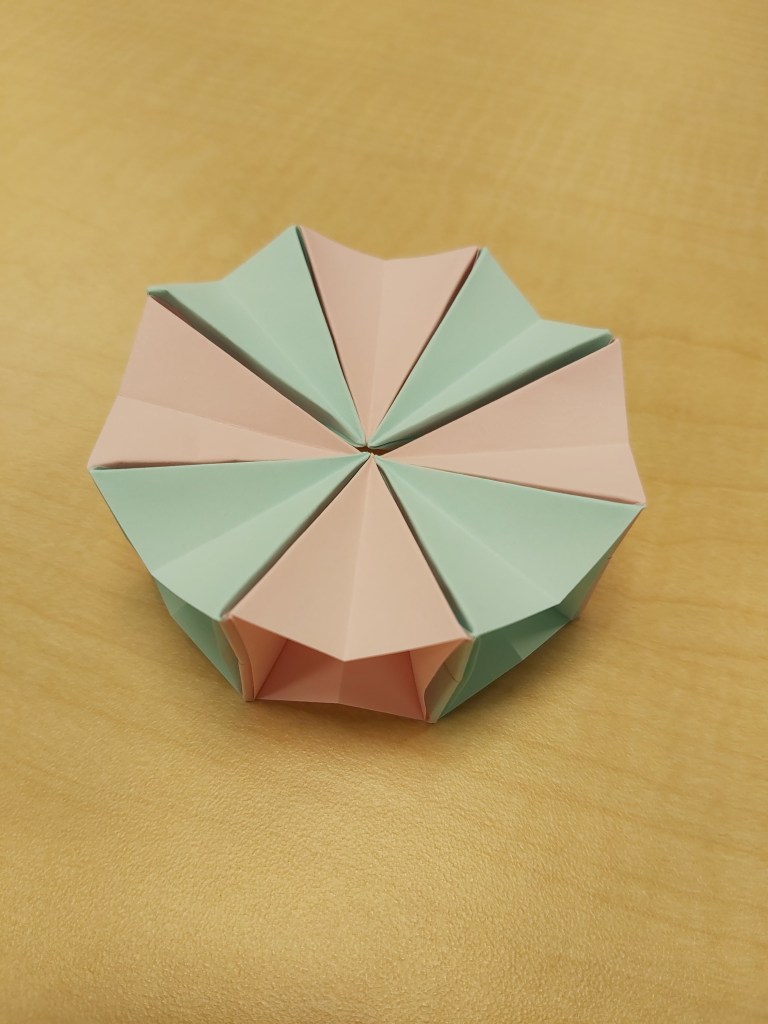
Blog 8.2- Transforming Circle Fidget
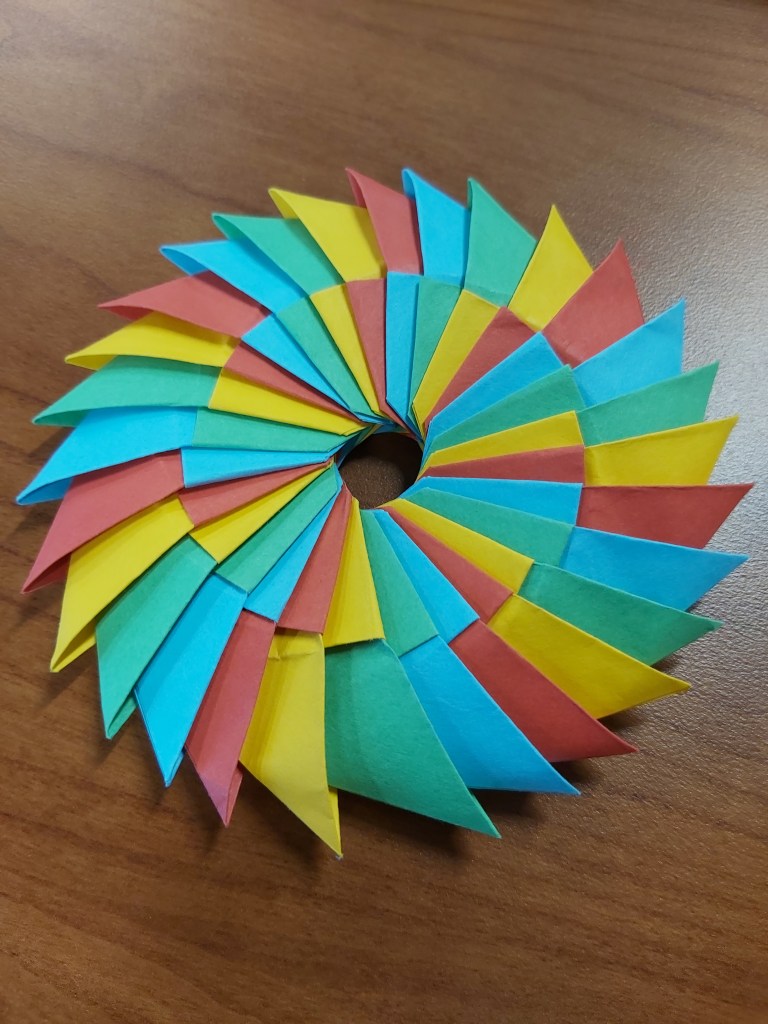
At the beginning of this year, I was looking at some different ideas for what I could make for my blogs and I came across this project that looked pretty cool so I decided to save it for my final blog. So for this week’s origami project, I made a (somewhat) transforming circle fidget. Overall this project isn’t super difficult, everything is pretty simple but it takes a long time to complete. With this being said if you as a reader are interested in making this project the link to the video I used will be put at the end of the post.
For this project, you will need a total of 28 post-it notes. The color doesn’t matter but I would recommend using more than one color and would recommend using either two, four, or seven different colors evenly, which will make the final product look much nicer. I used four different colors for this project which makes it look pretty cool. For this project, sticky notes are a great size and the sticky strip doesn’t get in the way too much.
Overall, I would rate this project as three out of 10 stars. Like I said before the folds for this project were simple, and the assembly was pretty easy, but we have also entered territory that I haven’t been into much while making origami, failure to perform the intended function. As I hinted at in the introduction, the final product didn’t work the way it was supposed to. The purpose of this fidget was to have it spin around which if you watch the first part of the video you can see. However, mine did not spin. I believe that this was caused by the lack of spacing between the pieces during the assembly process. Nonetheless, the final product still looks pretty cool despite it not working the way it was intended to work.
If you as a reader are interested in making this project the video is linked below.
Video Link: https://www.youtube.com/watch?v=e7_rIBuOr5U&feature=share
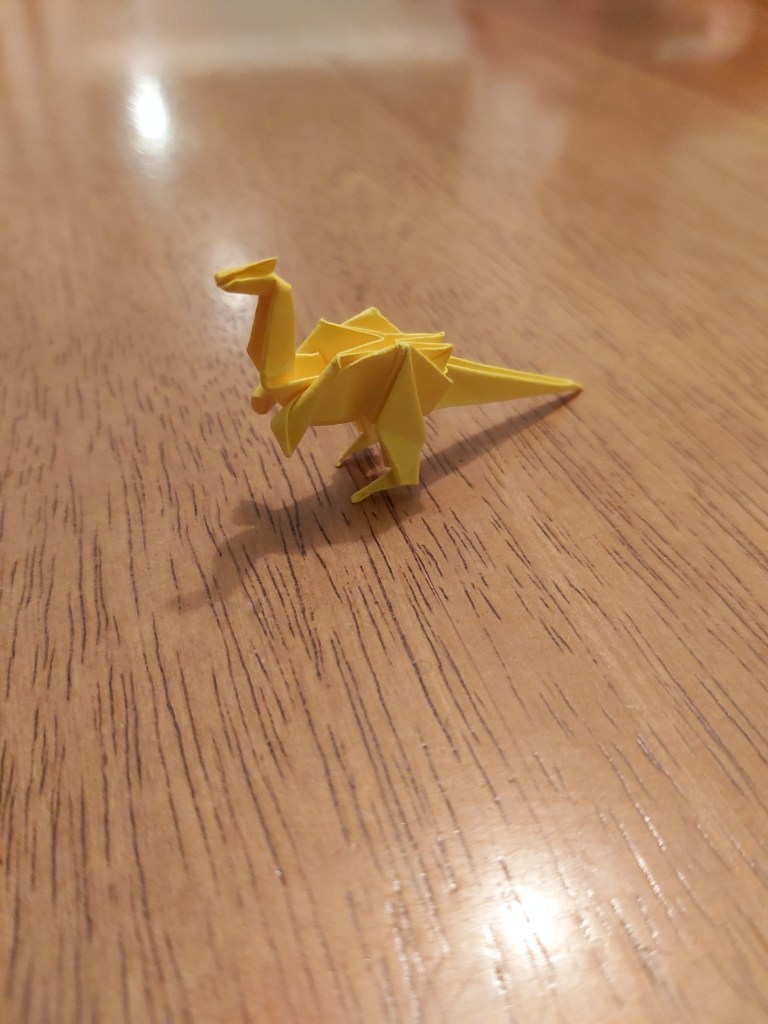
Blog 7.2- Dragon
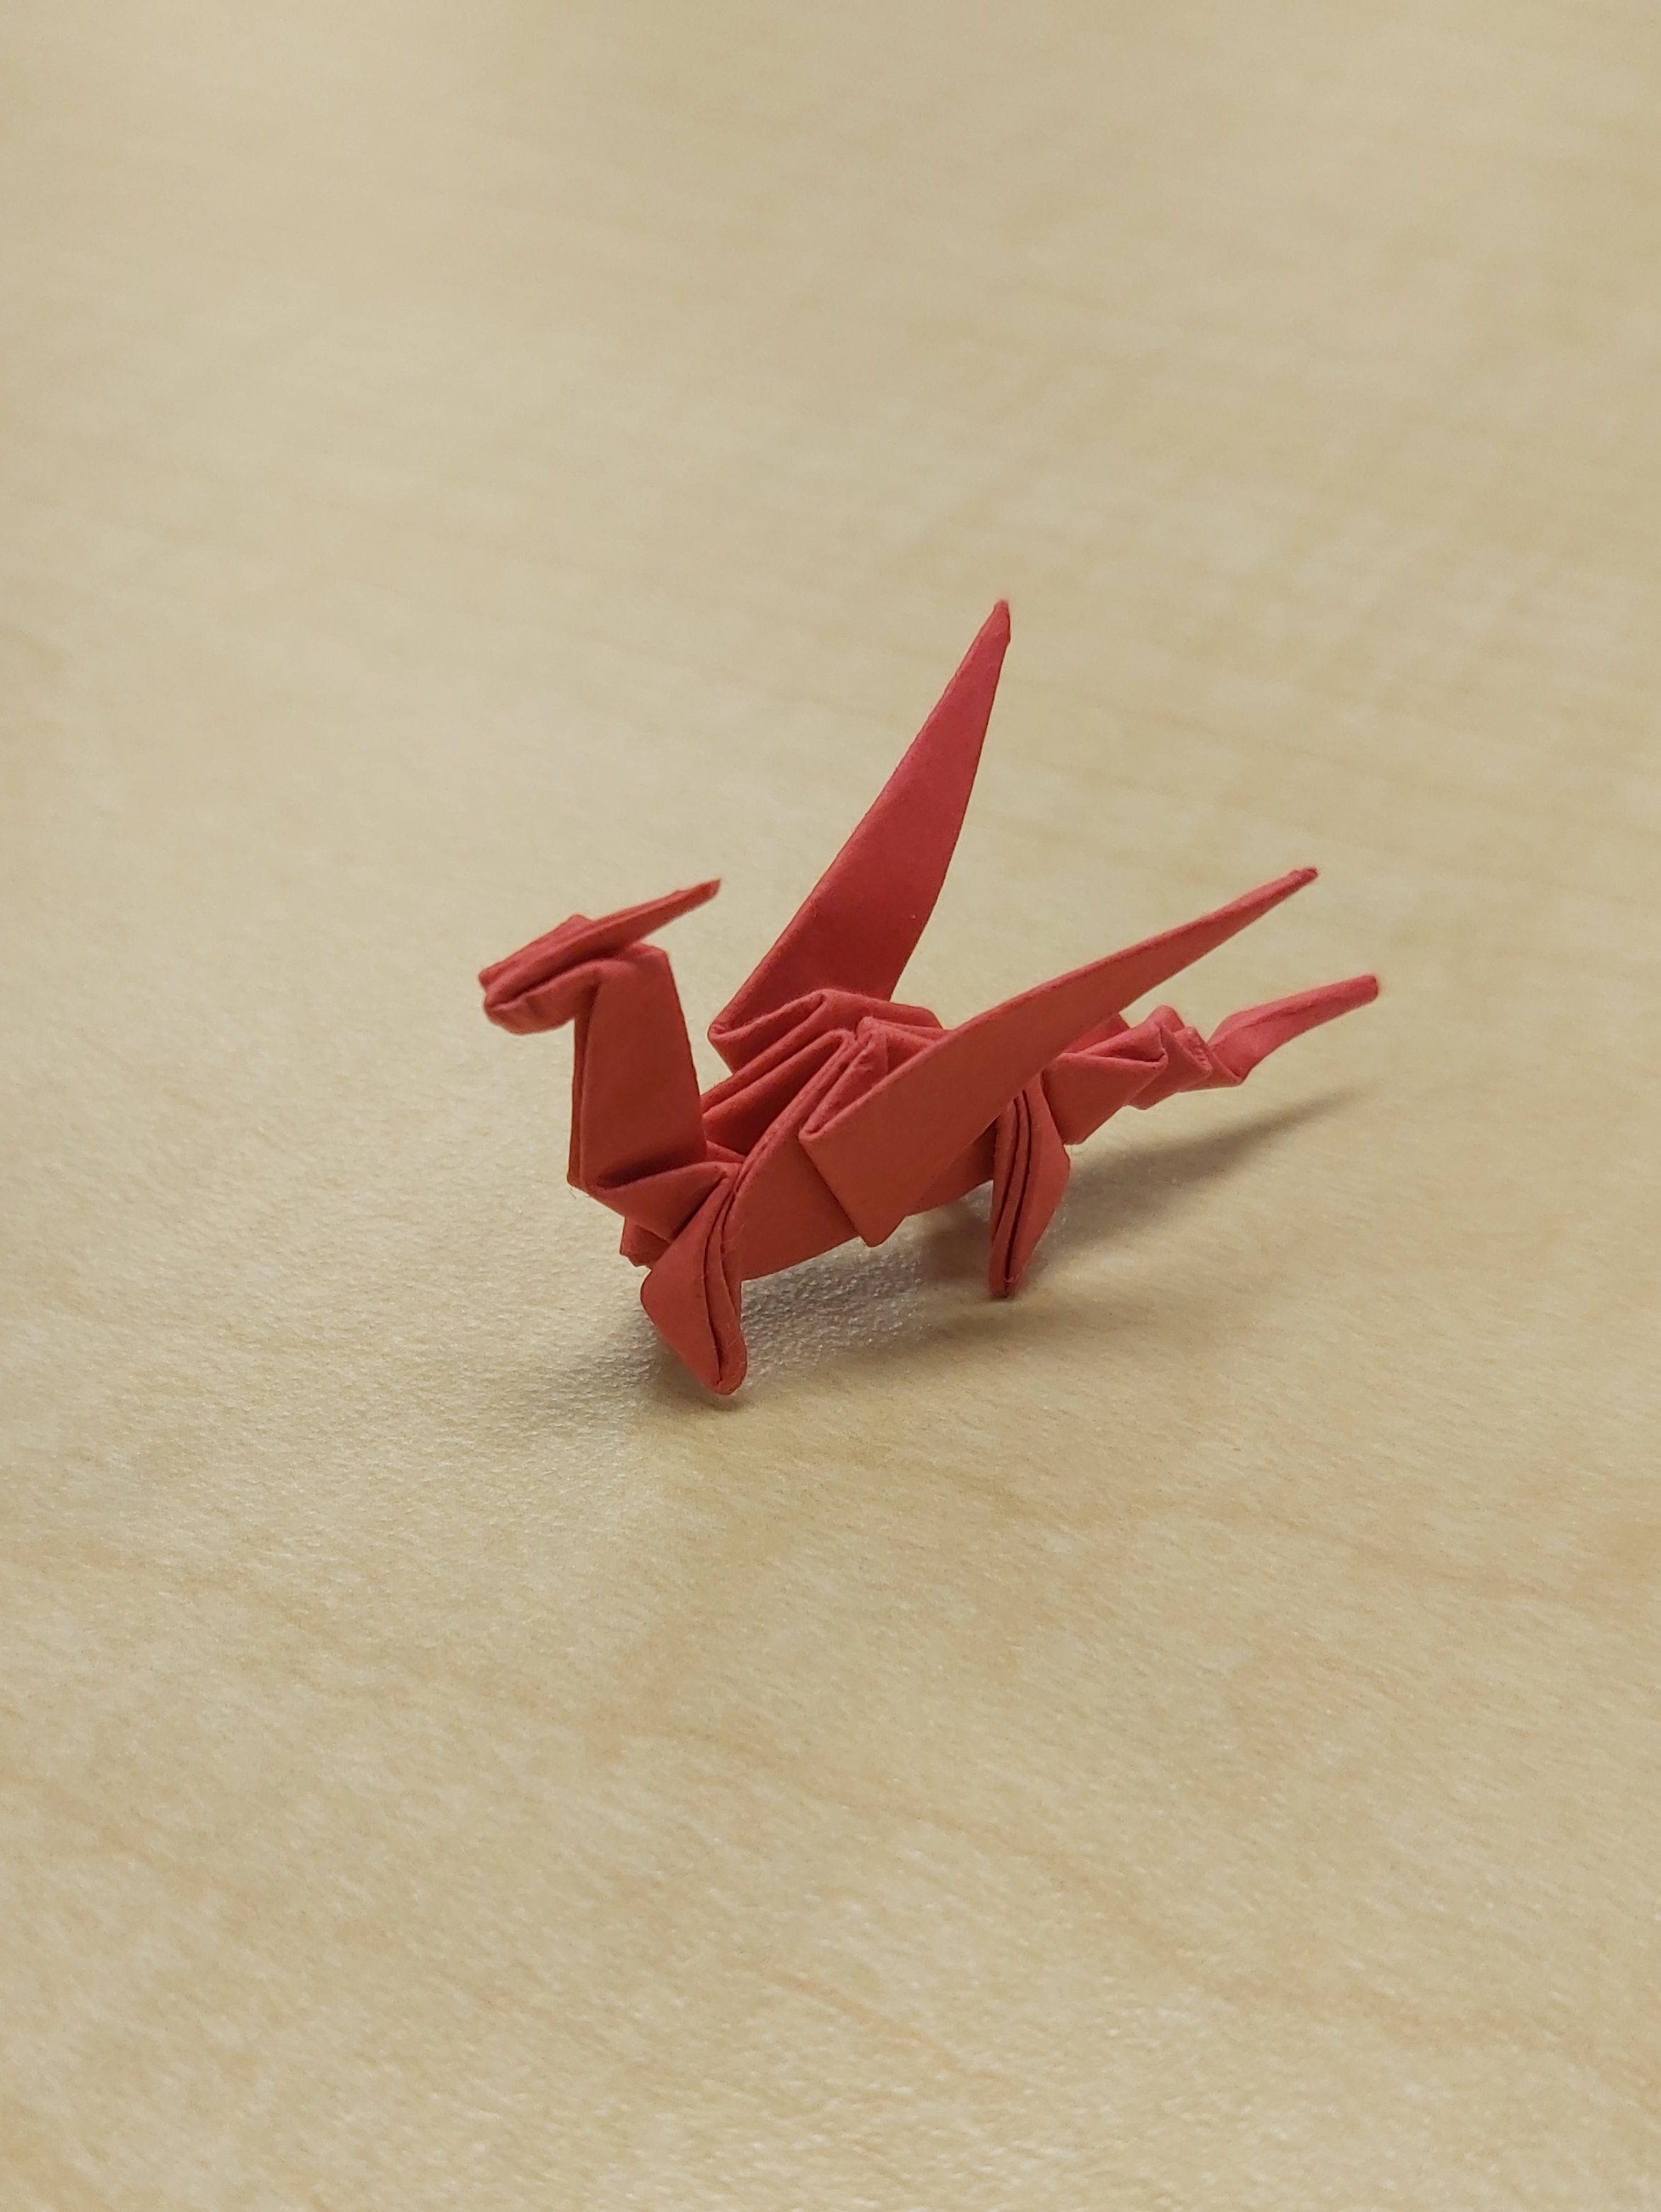
For this week’s origami project I decided to go back towards the animal/mythical beast section of origami to create an origami dragon. When I was looking for a video for this project I was swarmed with numerous tutorials on how to make this piece. So instead of watching all of the videos to find the best one, I decided to go to a previous page that I used a video from and looked for a tutorial there. Once I found the video I knew it would work because of my previous success with that channel. Overall, I would say that this project isn’t very hard. It features a lot of folds that have been used to create previous projects. If you are interested in making this project the link to the video that I used will be put at the end of the post.
For this project, you will only need one post-it note. The color of the note doesn’t matter and is up to the creator’s preference. For this project, I used a red sticky note to make a fiery dragon. For this project post-it notes are a great size to use, however, using a bigger piece of paper would make some of the folds easier. In addition to this, the first few folds are made a little more difficult by the sticky strip but it isn’t too difficult.
Overall, I would rate the difficulty of this project as a four out of 10 stars. Like I’ve previously stated most of the beginning folds are similar to previous projects. However, some of the other folds were a bit more complex but the video was really easy to follow which was very helpful.
If you as a reader are interested in making this project the video is linked below.
Video Link: https://www.youtube.com/watch?v=S80eAs5PcFI&feature=youtu.be
Blog 6.2- Icosahedron Using 30 Units

After my previous blog post when I created the origami cube I decided that I would do something similar for the next blog post. So for this week’s project, I created an Icosahedron. The pieces that are used to create the final product are the same as the pieces used for the cube with a slight modification. If you as a reader are interested in making this project the link to the video I used will be put at the end of the post.
For this project, you will need 30 sticky notes. The colors of the notes don’t matter but I used three different colors which resulted in a nice finished product. For this project, like the previous one, the sticky strip on the post-it notes makes some of the folds more difficult but it also helps hold everything together at the end.
Overall I would rate this project as a four out of 10 stars in difficulty. Making all of the pieces was very time-consuming but they were easy to make. Some of the folds were made difficult by the sticky strip but when the pieces are being put together it isn’t too difficult.
If you as a reader are interested in making this project the video is linked below.
Video Link: https://www.youtube.com/watch?v=_gxqwSuvQHU
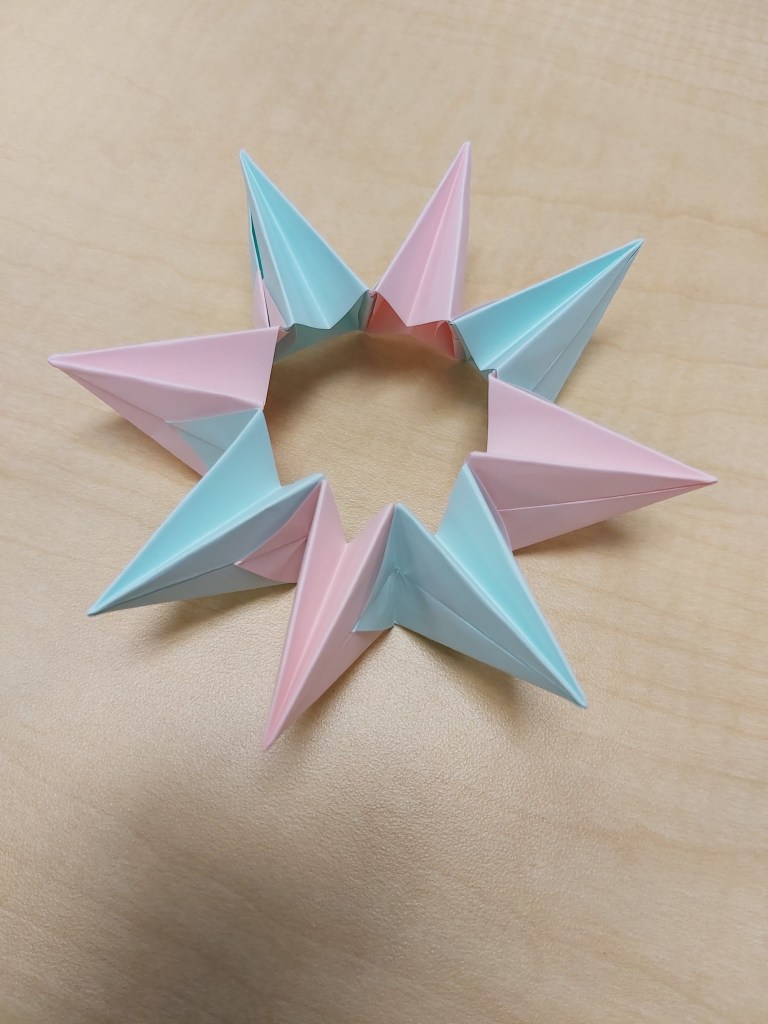
Vlog 1.2- Super Transforming Ninja Star
Blog 5.2- Cube
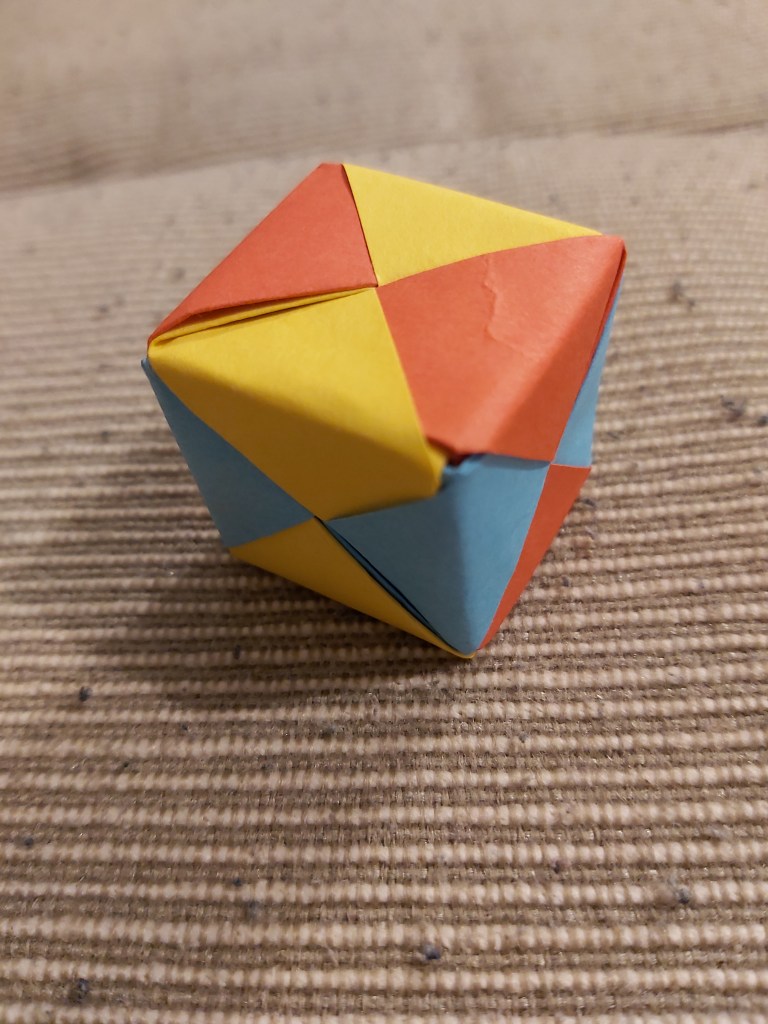
Going into this week I had very little inspiration for what I should create. Little did I know I would find my inspiration from my little brother. This past week my brother had been trying some different origami builds and he found a cube that was simple to create. However, the model he made was not strong at all and could fall apart if I sneezed on it. His most recent solution to this was wrapping his cubes in clear Scotch tape. This resulted in a final product that looked sloppy. So being the older brother I am I decided to show his cube up and to find a more secure cube, and that looks cooler. So for this week’s project, I made an origami cube. If you as a reader are interested in making this project the link to the video I used, as always will be put at the end of the post.
For this project, you will need six sticky notes. The colors don’t matter but I used three different colors which made the final product pretty cool. For this project, the sticky strip on the post-it notes makes some of the folds more difficult but it also helps hold everything together at the end.
Overall I would rate this project as a three out of 10 stars in difficulty. Making each piece was easy as long as you make each of them exactly the same. However, the sticky strip makes some of the folds and assembly difficult but it doesn’t cause too big of an issue.
If you as a reader are interested in making this project the video is linked below.
Video Link: https://www.youtube.com/watch?v=337QxhfpY4w
Blog 4.2- Special Edition…
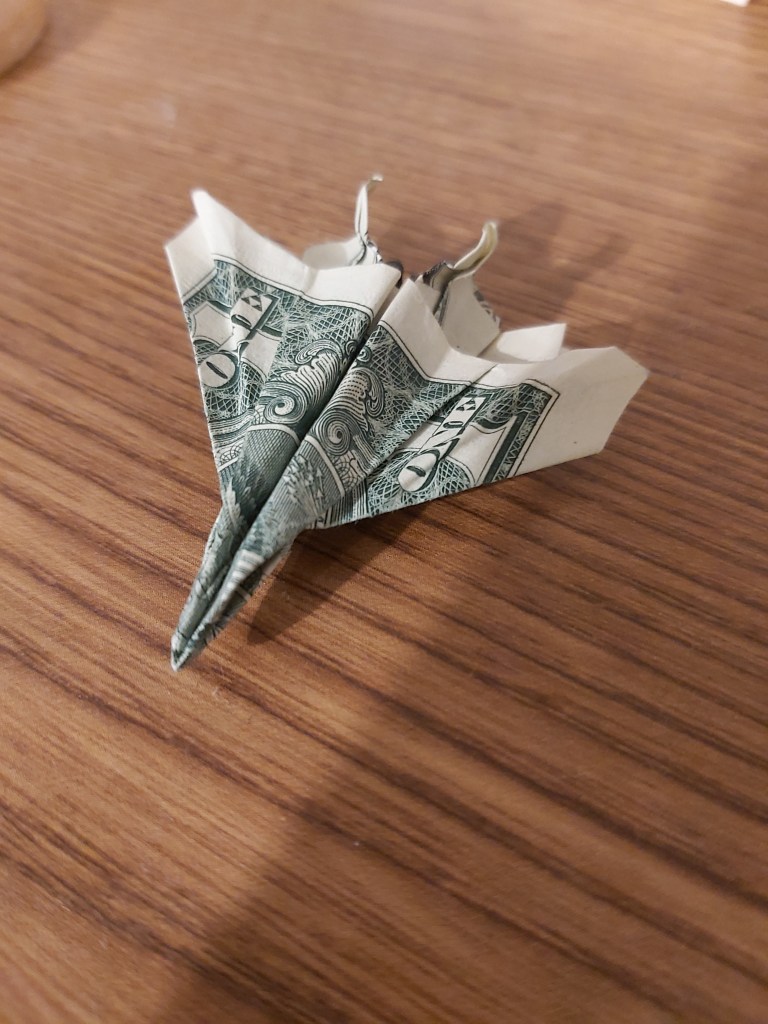
When thinking of ideas for this week’s project I decided to do something a little different from what I usually do for this blog. While I was searching for this week’s project I came across a few origami projects that used dollar bills. So I decided that for this week’s post I would try something different. With this, I am happy to say that this week’s origami project is an F-18 Jet made from a dollar bill. Making origami from a dollar bill was a new experience for me but I enjoyed the challenge and will most likely do more of this kind of origami in the future. As always I will put the link to the video that I used at the end of the blog so if you as a reader are interested in giving this project a try you can.
For this project, all you need is, as you may be able to guess, a dollar bill or a piece of paper with a 3:7 ratio. For this project, I used a 1 dollar bill. However, if you are a little more high class than I am you could use a 2, 5, 10, 20, or dare I say it, a 100 dollar bill to make this project. Or, you can just print off a copy of a dollar bill.
Overall I would rate this project as a six out of 10 stars in difficulty. This project is probably one of the more difficult projects that I have done so far. While the instructions in the video were extremely specific and easy to follow, a dollar bill is pretty small, and some of the folds were difficult to do with such a small area to fold. So if you as a reader are feeling a bit adventurous or are ready to try a harder project then this is the project for you to expand your horizon.
If you as a reader are interested in making this project the video is linked below.
Video Link: https://www.youtube.com/watch?v=_Sjxk_Z93yc&feature=emb_logo
Blog 3.2- Swan
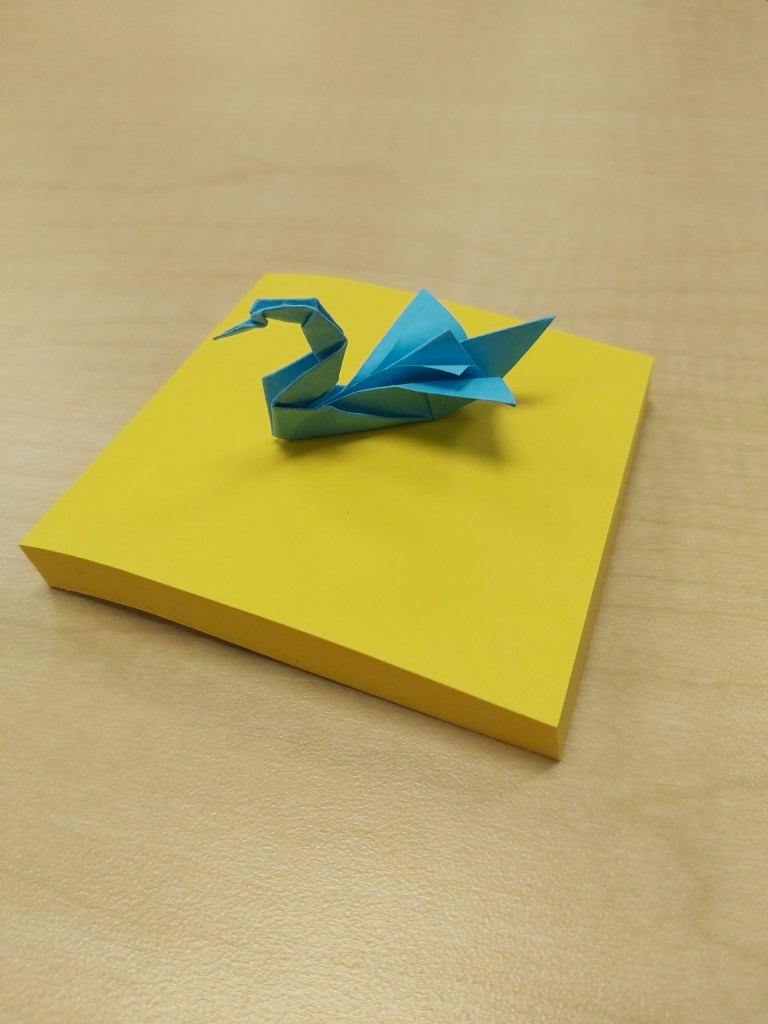
For this week’s origami project, I created an origami swan. Before this project I may have made one or two swans but this one is the best one that I have ever made. The folds for this project were pretty simple until you have to fold the neck and head which can be difficult for beginners. If you as a reader are interested in making an origami swan the link will be put at the end of the post.
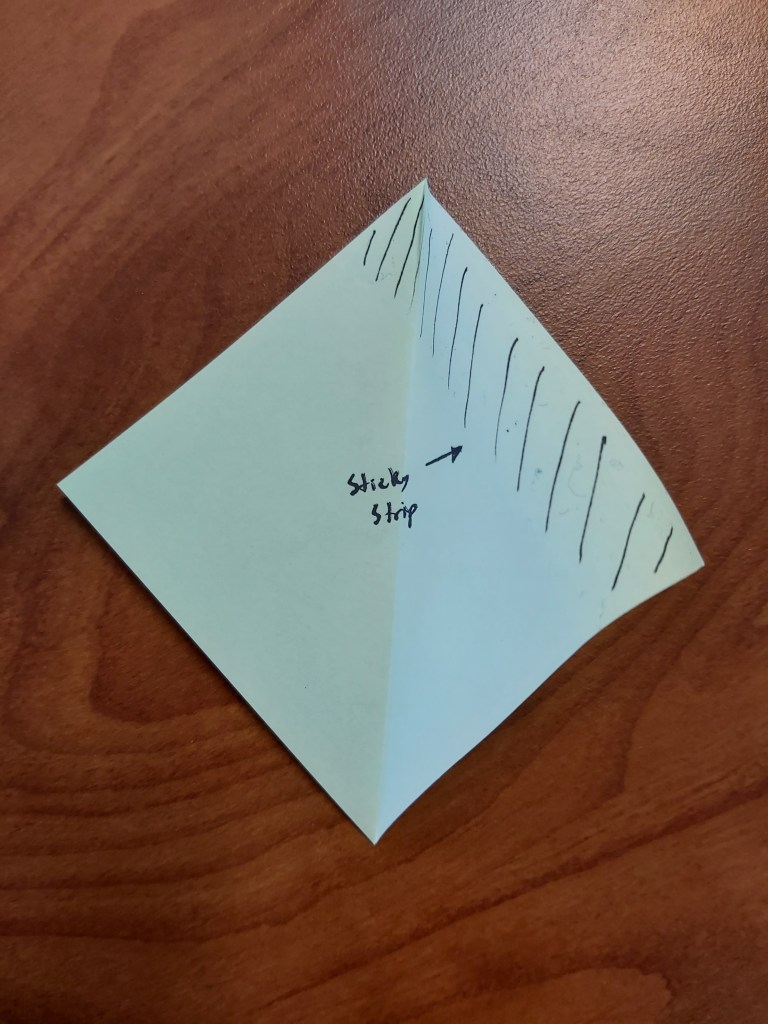
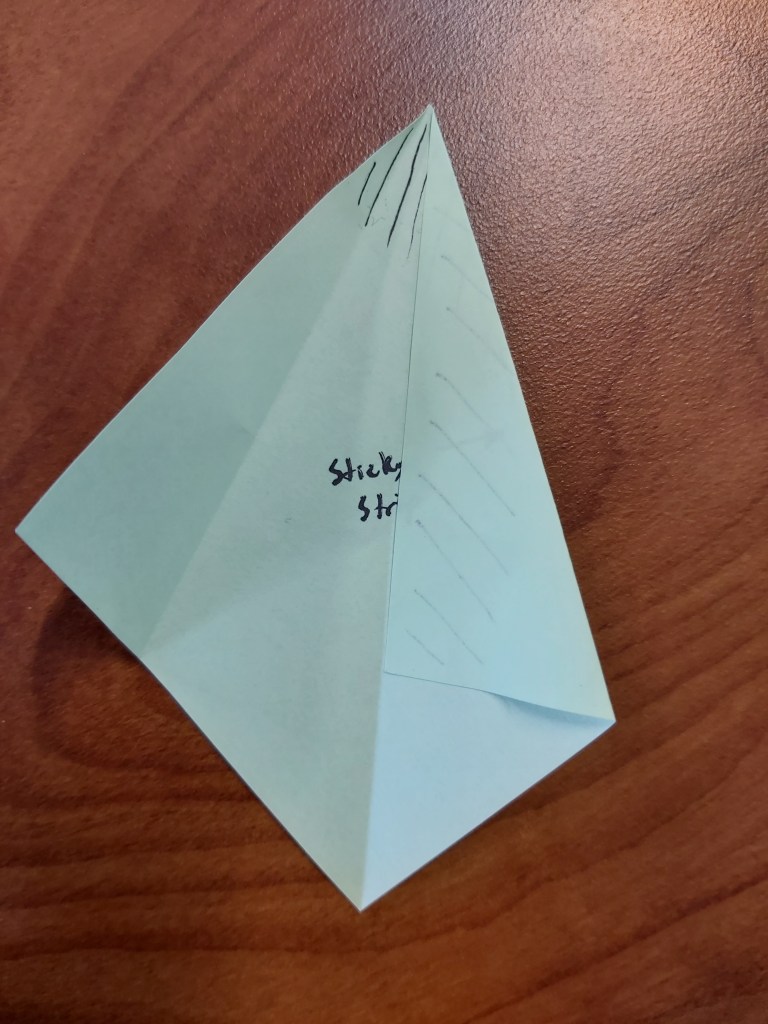
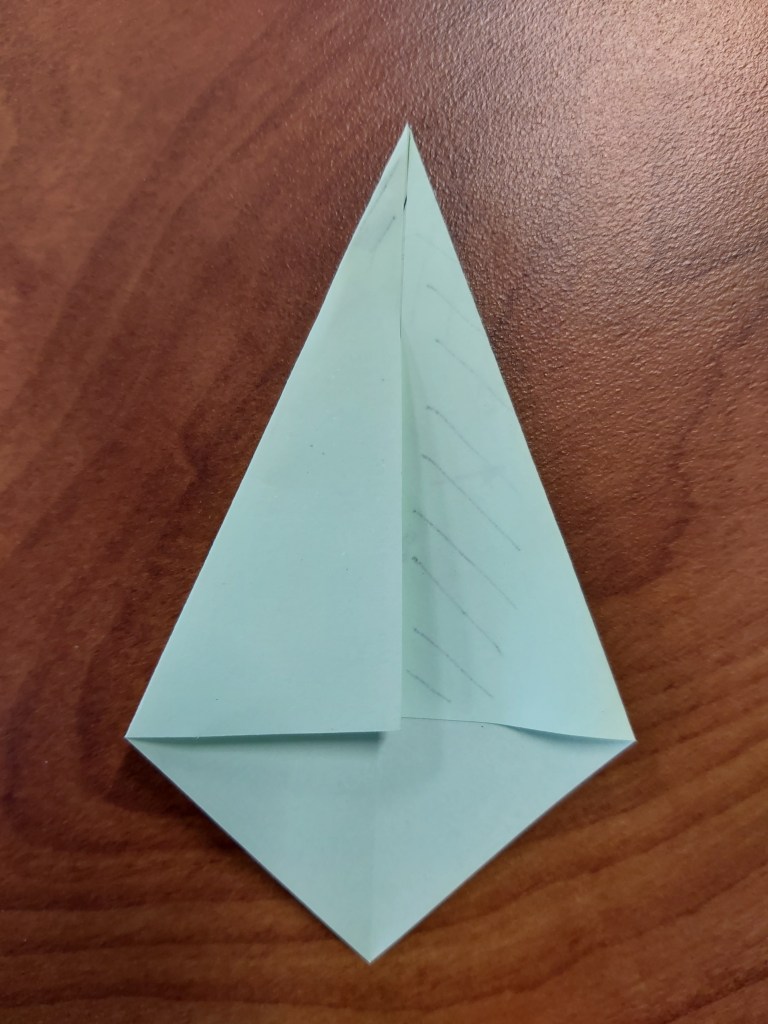
For this project, you will only one post-it note, so the color doesn’t matter. For this project, sticky notes work, as long as the beginning fold is done correctly. To make the first folds you will want to fold the sticky strip on top of its self (see pictures). If you do this the sticky strip won’t cause any issues with the remaining folds.
Overall, I would rate the difficulty of this project as a two out of 10 stars. I gave it this rating because the folds were easy, but folding the neck poses some slight difficulty. However, unlike the video I used in the Allosaurus Dinosaur, the video for the swan was very easy to follow and to know what needed to be folded.
If you as a reader are interested in making this project the video is linked below.
Video Link: https://www.youtube.com/watch?v=qEL77gX4pQ8
Blog 2.2- Allosaurus Dinosaur
For this week’s origami project I created an origami Allosaurus. In my past origami experience, I have made dinosaurs, however, I haven’t created this specific one before but I really liked how this one turned out. The folds for this project were fairly easy and were very similar to the beginning folds of the origami crane. If you are interested in making this project the video that I used will be put at the end of the post.
For this project, you will only need one post-it note. This color of the note doesn’t matter and is really up to the creator’s personal preference. For this project, sticky notes work, however, some of the folds are harder to do since the post-it notes are smaller and the sticky strip makes some of the beginning folds a little more difficult.
Overall, I would rate the difficulty of this project as a three out of 10 stars. Like I said before the sticky strips make it a little difficult to fold. In addition to this, the video that I used wasn’t the easiest video to follow which also played a small factor in the overall rating of this project.
If you as a reader are interested in making this project the video is linked below.
Video Link: https://www.youtube.com/watch?v=1FUol8muksM
Blog 1.2- Transforming Circle Firework
For this week’s origami project I made a Transforming Circle Firework. I have never made anything like this before but the steps were fairly simple and the folds were easy to do. So, if you have never done origami before then I would say that this is a fairly easy project to start with. The link to the video that I used will be put at the end of this post if you as a reader are interested in this project.
To make this project you will need a total of eight post-it notes. You can use one, two, four, or eight different colors depending on your preference. I chose to use two different colors, but to figure out how many of each you need for the project you need to divide eight by the number of colors you want to use. For this project, post-it notes are the perfect size however, the sticky strip makes the assembly a little difficult.
Overall, I would rate the difficulty of this project as a two out of 10 stars. Like I previously said folding the individual pieces is pretty easy to do, and the assembly isn’t that hard but the sticky strip makes it slightly difficult to put together.
If you as a reader are interested in making this project the video is linked below.
Video Link: https://www.youtube.com/watch?v=lPA3PwViU3w
